Showing posts with label dessert. Show all posts

Gluten-Free Lemon Bars


  • 1 stick unsalted butter
  • 1 cup lentil flour (sold in Indian stores as besan)
  • 1/2 cup confectioner sugar, divided
  • 2 eggs
  • 1 cup white sugar
  • 1/2 tsp baking powder
  • 1/4 tsp salt
  • juice of 1 or 2 lemons, depending on how sour you like them

  1. Pre-heat oven to 350°F.
  2. Melt butter.
  3. Place melted butter, lentil flour, and 1/4 cup confectioner sugar in a bowl. Stir until mixed.
  4. Press into a 9x9 baking dish.
  5. Bake for 20 minutes.
  6. While it bakes, place eggs, white sugar, baking powder, salt, and lemon juice in a bowl and whisk until frothy.
  7. When the crust is done baking, pour the liquid over it and return to the oven for another 20 minutes.
  8. Allow to cool completely, then shake the remaining confectioner sugar over the bars with a sieve.
  9. Slice and serve. I like to use a pizza cutter and wipe it off with a paper towel between cuts.

    My kids actually like these lemon bars even more than the standard flour gluten-full ones! The lentil flour makes a beautifully yellow crust.

Pumpkin Decorator Cookies


These soft cookies yield to the tooth, but are still solid enough to decorate. Yum! They do spread, so they're not right for cutters that require definition. Circles are ideal.


  • 3 cups flour
  • 2 tsp cornstarch
  • 1 tsp baking powder
  • 1/2 tsp baking soda
  • 1/2 tsp salt
  • 1/2 tsp ground cinnamon
  • 1/4 tsp ground nutmeg
  • 1/4 tsp ground ginger
  • 1/2 cup unsalted butter, softened
  • 1/3 cup unflavored vegetable shortening
  • 1 1/4 cups granulated sugar
  • 2 large egg yolks
  • 2/3 cup canned pumpkin puree
  • 1 tsp vanilla extract


    1. Preheat oven to 350 degrees. In a mixing bowl whisk together flour, cornstarch, baking powder, baking soda, salt, cinnamon, nutmeg, and ginger for 20 seconds, set aside.
    2. In the bowl of an electric stand mixer fitted with the paddle attachment, cream together butter, shortening and sugar until pale and fluffy. Mix in egg yolks one at a time. Mix in pumpkin puree and vanilla extract. With mixer set on low speed, slowly add in dry ingredients and mix until combined.
    3. Roll, cut and bake in preheated oven 11 - 12 minutes. Cool on baking sheet several minutes then transfer to a wire rack to cool completely.

    Chocolate Chip Cookies for Decorators

    I considered just linking to Sweet Sugar Belle's recipe, but if her site were to go down, I'd be lost without this recipe, which is perfection for royal icing art.

    • 1 c unsalted butter
    • 1/3c granulated sugar
    • 1/2 c light-brown sugar
    • 1 large egg yolk
    • 2 tsp vanilla extract
    • 2 - 2 ½ c all-purpose flour
    • ½ tsp salt
    • 1 ½ c semi-sweet mini-chocolate chips

    Instructions

    1. Cream together the butter and sugars. To that add the vanilla and egg yolk. Sift together the flour and salt, and add it one cup at a time until completely incorporated. Then, BY HAND fold in the chocolate chips. You can do it with your mixer, but it might break them up, so I would really just do it the old fashioned way.
    2. MEANWHILE, PREHEAT YOUR OVEN TO 350°
    3. While you wait for the oven to warm, wrap your dough in plastic wrap and chill for at least thirty minutes. When it is chilled, roll out cookies on lightly floured parchment and bake at 350° for 10-12 minutes.
    4. These cookies roll and cut SO WELL!
    http://www.sweetsugarbelle.com/2011/01/in-the-mood-for-chocolate-chip/

    Peppermint Delight

    Chocolate Graham Crust

    1 10-oz box chocolate teddy grahams
    2 tbsp sugar
    1 stick butter, melted

    Peppermint Ice Cream Filling

    8 oz red-and-white striped peppermint candies or candy canes
    6 large egg yolks
    1/2 cup sugar
    1/4 cup water
    1 teaspoon peppermint extract
    3 cups chilled whipping cream

    Ganache Topping 

    1 cups chilled whipping cream
    1/2 cup light corn syrup
    12 oz bittersweet chocolate chips

    Garnish

    1/2 cup whipping cream
    Mini candy canes or mint sprigs

    Steps

    1. Prepare the crust
      1. Finely grind cookies and sugar in processor.
      2. Add melted butter and blend with a fork until crumbs begin to stick together.
      3. Press crumbs firmly onto bottom of 9-inch-diameter springform pan with 2 3/4-inch-high sides.
      4. Place in freezer.
    2. Prepare the filling
      1. Grind half the candies finely and set aside. (If you have some stale candy canes, this is where you want them.)
      2. Grind the other half of the candies roughly, leaving some small pieces.
      3. Whisk the yolks, sugar and water in a medium metal bowl to blend.
      4. Set the bowl over saucepan of rapidly simmering water. Do not allow the bottom of the bowl to touch the water). Whisk constantly until your candy thermometer registers 170°F, about 10 minutes.
      5. Remove bowl from over water, and immediately add the finely ground candy.
      6. Whisk until the candy is melted.
      7. Let the mixture stand until cool, whisking occasionally. (About 5 minutes.)
      8. Mix in the remaining candy and the peppermint extract. This batch of candy will not melt.
      9. Using an electric mixer, beat the cream to stiff peaks.
      10. Fold the cream into the yolk mixture.
    3. Spoon the filling into the crust and spread into an even layer to the edges of the pan.
    4. Wipe off the sides of the pan.
    5. Cover and freeze at least 6 hours.
    6. Prepare the topping.
      1. Bring cream and corn syrup to a simmer in a heavy saucepan.
      2. Remove from heat and add the chocolate chips.
      3. Whisk until smooth.
      4. Cool until just lukewarm and slightly thickened, whisking occasionally. This takes about 20 minutes.
    7. Pour the topping over the frozen filling.
    8. Tap the pan on a counter to dislodge air bubbles and even the surface of the ganache.
    9. Freeze until firm, at least 2 hours.
    10. Keep the cake frozen until serving. It melts!*
    11. Garnish
      1. Whip cream to stiff peaks.
      2. Fit a pastry bag with a star tip and pipe rosettes around the edge of the cake.
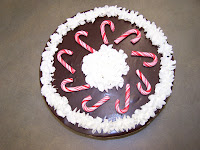
      3. Decorate with candy canes, mint sprigs and/or remaining cream.
    This recipe is the All-American Peppermint Stick Torte with Fudge Topping from Epicurious. I made enough modifications to the original recipe not to want to store all changes in notes on the Epicurious site.

    I recommend starting this two days before you expect to serve it. Prepare the crust and the filling on the first day. On the second day, take care of the ganache. Freezing overnight makes life easier.

    *You can garnish the cake before you remove the springform pan side. That's what I do if I'll be transporting the cake. It needs to be in a cooler, on ice.

    Dangerously easy baked apple dumplings

    2 small apples (Macintosh works well)
    1 package crescent rolls
    4 tbsp butter
    6 tsp brown sugar
    1 tsp cinnamon
    2 pinches nutmeg
    1/4 cup apple juice
    1/4 tsp vanilla
    1. Preheat the oven to 350 and butter an 8x8 baking dish.
    2. Peel and core the apples.
    3. Open up the crescent rolls into four rectangles. Pinch the seams together with wet fingers to seal. Pinch two sets of rectangles together. You should end up with two pastry squares, each made from four triangles, as in the diagram.
    4. Place a cored apple in the center of each pastry square.
    5. Fill each hollow core with 1 tbsp butter, 2 tsp brown sugar, 1/2 tsp cinnamon, and a pinch of nutmeg. Don't worry if anything spills onto the pastry.
    6. Sprinkle 1 tsp brown sugar on the pastry at the base of each apple.
    7. Pull the pastry corners up and seal the apple in.
    8. Place the dumplings in the prepared dish. Add the butter, apple juice, vanilla, and remaining 2 tsp sugar to the dish.
    9. Bake at 350 for 20 minutes.

    This recipe is portioned for two, simply because my little ones don't care for cooked fruit. It scales easily though, and makes for a huge portion! You should probably halve the servings. I invented this on Thanksgiving, when I was craving pie, but couldn't rationalize baking a full-size for just me while my husband was overseas.

    Creamy raspberry bites


    3 oz cream cheese
    1/4 tsp raspberry extract
    3 drops red food colouring
    4 to 4.5 cups confectioners sugar
    granulated sugar for dredging OR melted chocolate for dipping
    1. Put the cream cheese, raspberry extract and food colouring in the bowl of your mixer and mix, scraping the sides, until smooth.
    2. Add the confectioners sugar, 1/2 cup at a time, mixing in each portion thoroughly. If the mixture is not stiff with 4 cups of sugar, add another 1/2 cup.
    3. Mix for 2 minutes, until well combined.
    4. Scoop out 1/2-teaspoon portions and roll into balls.
    5. Dredge each ball in granulated sugar or dip in chocolate to make truffles.
    This is essentially the same recipe as the Super Easy Mints, but with raspberry flavour. The mints also make excellent truffle centers when dipped in chocolate.

    Super easy mints


    3 oz cream cheese
    1/4 tsp peppermint extract
    3 drops green or red food colouring
    4 to 4.5 cups confectioners sugar
    granulated sugar for dredging

    1. Put the cream cheese, peppermint extract and food colouring in the bowl of your mixer and mix, scraping the sides, until smooth.
    2. Add the confectioners sugar, 1/2 cup at a time, mixing in each portion thoroughly. If the mixture is not stiff with 4 cups of sugar, add another 1/2 cup.
    3. Mix for 2 minutes, until well combined.
    4. Scoop out 1/2-teaspoon portions and roll into balls.
    5. Dredge each ball in granulated sugar.

    These mints require refrigeration, and are good for up to two weeks. Keep this recipe a secret, and your neighbours will think you slaved over these melt-in-your-mouth treats.

    Eggnog Popovers

    2 large eggs
    1 cup eggnog
    1 tsp vanilla extract
    1/8 tsp nutmeg
    1 cup all purpose flour
    1/2 teaspoon salt
    1-2 tbsp melted butter the pan

    1. Preheat the oven to 450F.
    2. Heat a muffin tin, greased well with the melted butter, in the oven for 5 minutes while you mix the batter.
    3. In a large bowl, whisk together the eggs, eggnog, vanilla and nutmeg. When smooth, whisk in flour and salt.
    4. Remove heated muffin tin from oven and quickly divide the batter into the muffin cups.
    5. Bake for 20 minutes at 450F, then use a sharp knife to poke a small hole in the top of each popover. This prevents them from deflating.
    6. Turn oven down to 375F. Bake for an additional 15 minutes, until golden brown and crisp.

    Chocolate Chip Banana Bread

    1 3/4 cup flour
    1 cup oil
    1 tsp baking soda
    1 1/3 cup sugar
    7 tbsp cocoa powder
    3 eggs
    1/8 tsp salt
    1 tsp vanilla
    1 tbsp instant coffee powder
    5 ripe bananas (well mashed)
    1/4 cup semi-sweet chocolate chips


    1. Preheat oven to 350 degrees F.
    2. Sift together the flour, baking soda, salt and cocoa powder. Set aside.
    3. Using a mixer, beat together the oil, sugar, eggs and vanilla until well blended.
    4. Add the coffee powder and the well mashed bananas.
    5. Add the flour mixture in thirds, beating only until well blended after each addition. Don't over-beat!
    6. Stir in the chocolate chips.
    7. Pour the batter into a VERY WELL GREASED 9" x 5" loaf tin.*
    8. Bake on the middle rack of the oven. The 9" x 5" tin will take 70-80 minutes, a small tin 45-50 minutes. Bake until a toothpick inserted in the center of the loaf comes out clean.
    9. Remove from the oven, cool bread in the pan(s) 5 minutes. Remove from the pan(s) and complete cooling on a wire rack.


    * If the bananas are large, there may be some leftover batter, which can be baked in a small loaf tin.

    If you have the patience, let the bread sit overnight for the flavor to develop! I got this recipe from my friend Dustin. He's a wonderful baker, and this is one of his best dishes.

    Chocolate Almond Meringues


    3 egg whites, room temperature
    1/4 tsp cream of tartar
    2 tbsp cream of tartar
    1/2 cup sugar
    1/4 tsp almond extract
    1. Preheat oven at 150 degrees. (My oven only goes down to 170, but lower would be better.)
    2. Using the fastest setting on your mixer, beat the egg whites and cream of tartar until they form stiff peaks.
    3. Sift sugar and cocoa powder into mixture. Beat until combined.
    4. Add almond extract and stir in.
    5. If the eggs are no longer holding their stiff peaks, beat again until they do.
    6. Pipe 2-3 tablespoon mounds onto cookie sheet lined with parchment paper. I find it easiest to spoon the mixture into a disposable zipper bag, seal it, and snip a corner off.
    7. Bake for two hours. Turn cookie sheet halfway through to ensure that meringues dry evenly.
    8. Leave meringues to dry overnight.
    These meringues turned out chewier than I wanted. Next time, I'll store them with a desiccant packet, and perhaps try meringue powder.

    Cinnamon Rolls

    3/4 cup plus 2 tbsp water
    4 tbsp butter, softened
    1 tsp salt
    1/4 plus 1/3 cup sugar
    2 1/2 cups flour
    1 tsp yeast
    2 tsp cinnamon
    1. Place the water, 2 tbsp butter, salt, 1/4 cup sugar, flour and yeast in your bread maker. This is the order my bread maker likes, but yours may differ.
    2. Run your machine on the dough cycle for a 1 lb loaf.
    3. Grease a 9" by 9" pan. Glass works great.
    4. Flatten dough into rectangle. The thinner the rectangle, the more swirls to your rolls. I usually make mine 6" by 12". You can use a rolling pin, or just pat it out with your hands. My girls love this part!
    5. Spread remaining 2 tbsp butter on dough.
    6. Mix remaining 1/3 cup sugar and cinnamon. Sprinkle this over the dough.
    7. Roll the dough tightly along the long edge. You'll end up with something resembling a sausage. Pinch the edge into the dough to seal.
    8. Cut roll into 9 slices of equal width. Arrange the slices, cut ends down, in a square in the pan.
    9. Cover and let rise for an hour. This recipe is very forgiving. I've let it rise anywhere between half an hour and 2 hours, and they've come out great.
    10. Preheat oven to 375 degrees.
    11. Bake 25-30 minutes until golden brown.
    12. Turn onto a wire rack. I find it easiest to take one cooling rack, cover the pan with it and then turn the pan over. I then take a second cooling rack, put it upside down on the rolls, and flip the whole thing over. This way you don't end up with burning cinnamon goop all over you, not that I've ever done that!
    13. Frost with cream cheese frosting or vanilla glaze.
    These cinnamon rolls are super-easy and have been requested as our Christmas breakfast tradition. I've doubled the recipe with great success. My husband has been known to eat 8 of these at one sitting.

    Amaretto Brownies

    2/3 cups sliced or slivered almonds
    8 oz semisweet chocolate
    1/3 cup plus 3 tbsp butter
    1 1/4 cups flour
    1/2 cup sugar
    3 tbsp amaretto (could use 1 1/4 tsp almond extract)*
    1 tsp baking powder
    1/2 tsp salt
    2 eggs, lightly beaten
    2 cups powdered sugar
    1 to 2 tbsp milk
    1. Heat oven to 350 degrees.
    2. Grease 13" x 9" pan.
    3. Place half the almonds in a food processor or coffee grinder and process in pulses until ground.
    4. Heat chocolate and 1/3 cup butter in large saucepan over low heat, stirring often, until melted. (Leave remaining butter out to soften.)
    5. Remove saucepan from heat and stir in ground almonds, flour, sugar, 2 tbsp amaretto or 1 tsp extract, baking powder, eggs and salt.
    6. Spread batter in pan and bake 22-27 minutes. (I stick a toothpick in the center. If it comes out clean, it's done.)
    7. Cool brownies completely.
    8. Mix powdered sugar, 3 tbsp butter, 1 tbsp amaretto or 1/4 tsp almond extract, and 1 tbsp milk until smooth. Add the extra tbsp milk if needed.
    * I use the amaretto in the brownies and the almond extract in the frosting. I like the amaretto flavour better, but don't want my toddlers to ingest the alcohol in the frosting, since it doesn't get cooked away. I know, it's paranoid of me, but I'm a protective mom.

    Pear-and-applesauce

    4 ripe pears*
    2 medium apples**
    1 tsp ground cinnamon
    pinch ground cloves
    pinch ground nutmeg
    1. Peel, core and cut the fruit into chunks.
    2. Put all the ingredients in a saucepan and cook over medium heat until mushy. This takes about 30 mins.
    3. Process sauce to desired texture.***
    * I use Bartlett pears.
    ** I prefer Granny Smith for their tartness. Gala apples are a good choice if you like a sweeter sauce.
    *** Today, I just used the back of a spoon to break down any large pieces, making a very chunky sauce. Usually, I run into through my manual food processor, which leaves some small chunks. When the twins were new to solid foods, I used my blender to make a very smooth sauce.

    The spices are my family's preference, but this pear-and-applesauce is equally delicious with no spices all, smaller quantities, or different flavours. We eat it straight, but it would be great on oatmeal, granola or pancakes.
    This blog is simply a collection of my culinary success stories/recipes. Some recipes are original, but most are adaptations (or wholesale adoptions) of other people's recipes. I also blog about the life and times of a working mother of twins.
     
    Copyright 2009 Cooking Happy All rights reserved.
    Blogger Templates created by Deluxe Templates
    Wordpress Theme by EZwpthemes